AOP(Aspect Oriented Programming)
- 관점 지향 프로그래밍
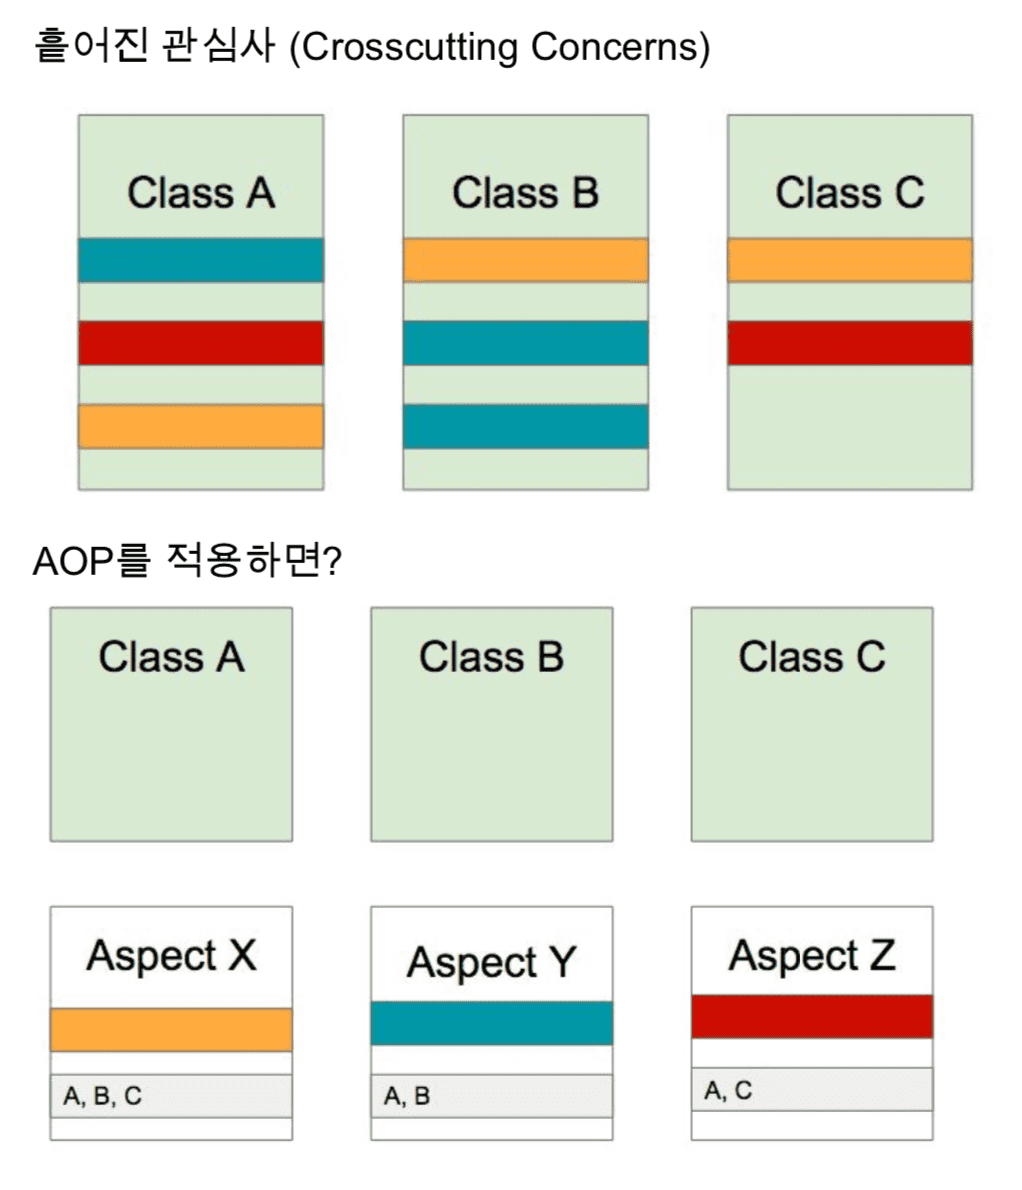
- 어떤 로직을 기준으로 핵심 관심 사항과 공통(부가) 관심 사항으로 나누어 모듈화
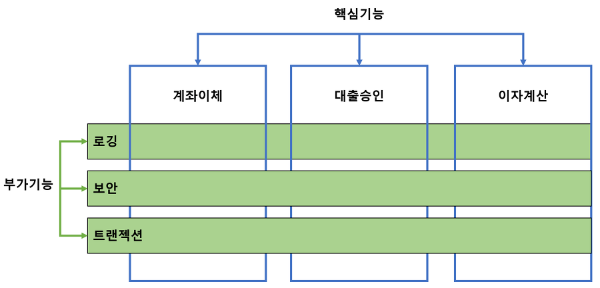
- 핵심 관심 사항 : 적용하고자 하는 핵심 비즈니스 로직
- 공통(부가) 관심 사항 : 핵심 로직을 실행하기 위해 행해지는 부가적인 로직 ex) DB 연결, 로깅 등
- 분리한 부가 기능을 Aspcet라는 독특한 모듈 형태로 만들어서 설계하고 개발 (공통 모듈을 손쉽게 적용 가능)
💡 한 마디로 AOP란?
부가기능을 Aspcet로 정의하여, 핵심기능에서 부가기능을 분리함으로써
핵심기능을 설계하고 구현할 때 객체지향적인 가치를 지킬 수 있도록 도와주는 개념
(실무에서는 호불호가 갈린다고 한다)
💡 AOP 등장 배경
기존 OOP에서 공통관심사항을 여러 모듈에서 적용할 때,
중복된 코드를 양상 하는 한계를 해결하기 위해 등장!
Spring AOP 용어
Target
- 핵심 기능을 담고 있는 모듈
- 부가 기능을 부여할 대상
Aspect
- 여러 객체에 공통으로 적용되는 공통 관심 사항
- AOP의 기본 모듈
- Aspect = Advice + Pointcut (Spring에서는 Adbisor라고도 한다!!)
- Singleton 형태의 객체로 존재
Advice
- Target에 제공할 부가기능을 담고 있는 모듈
- 어느 시점에 어떤 공통관심사항(Aspect)를 적용할지 정의한 것
| Advice 종류 | 설명 |
| Before | 대상 객체의 메소드가 실행되기 전에 실행 |
| After Returning | 대상 객체의 메소드 실행이 정상적으로 끝난 뒤 실행 |
| After Throwing | 대상 객체의 메소드 실행 중 예외가 발생한 경우 실행 |
| After | 대상 객체의 메소드의 정상/예외 여부와 관계 없이 메소드 실행 종료 후 실행 (finally와 유사) |
| Around | - 위의 4가지 Advice를 모두 구현할 수 있는 Advice - 대상 객체의 메소드가 실행되기 전, 후 실행 |
JoinPoint
- Aspect가 적용될 수 있는 지점 (method, field)
- 즉, Pointcut이 될 수 있는 후보군들!!
Pointcut
- 공통관심사항이 적용될 JoinPoint (선택된 JoinPoint)
- Advice를 적용할 target의 method를 선별하는 정규 표현식
Weaving
- 어떤 Adivce를 어떤 Pointcut(핵심사항)에 적용시킬 것인지에 대한 설정
- 즉, Pointcut에 의해서 결정된 Target의 JoinPoint에 부가기능(Advice)를 삽입하는 과정
- 핵심기능(Target)에 영향을 주지 않으면서 필요한 부가기능을 추가할 수 있도록 해주는 처리 과정
Pointcut 표현식
# public 메소드 실행
execution(public * *(..))

# 이름이 set으로 시작하는 모든 메소드 실행
execution(* set*(..))

# AccountService 인터페이스의 모든 메소드 실행
execution(* com.test.service.AccountService.*(..))

# service 패키지에 정의된 메소드 실행
execution(* com.test.service.*.*(..))

# 서비스 패키지와 하위 패키지의 모든 메소드 실행
execution(* com.test.service..*.*(..))

# 서비스 패키지 내의 모든 JoinPoint
within(com.test.service.*)

# 서비스 패키지 및 하위 패키지의 모든 JoinPoint
within(com.test.service..*)

# AccountService 인터페이스를 구현하는 프록시 개체의 모든 JoinPoint
this(com.test.service.AccountService)

# AccountService 인터페이스를 구현하는 대상 객체의 모든 JoinPoint
target(com.test.service.AccountService)

# 하나의 파라미터를 가지고 전달된 인자가 Serializable인 모든 JoinPoint
args(java.io.Serializable)

# 대상 객체가 @Transactional 어노테이션을 갖는 모든 JoinPoint
@target(org.springframework.transaction.annotation.Transactional)

# 대상 객체의 선언 타입이 @Transactional 어노테이션을 갖는 모든 JoinPoint
@within(org.springframework.transaction.annotation.Transactional)

# 실행 메소드가 @Transactional 어노테이션을 갖는 모든 JoinPoint
@annotation(org.springframework.transaction.annotation.Transactional)

# 단일 파라미터를 받고, 전달된 인자 타입이 @Classified 어노테이션을 갖는 모든 JoinPoint
@args(com.test.security.Classified)

# 'accountRepository' 빈
bean(accountRepository)

# 'accountRepository'를 제외한 모든 빈
!bean(accountRepository)

#  모든 빈
bean(*)

# 이름이 'account'로 시작되는 모든 빈
bean(account*)

# 이름이 'account'로 시작되는 모든 빈
bean(account*)

# 이름이 'Repository'로 끝나는 모든 빈
bean(*Repository)

# 이름이 'accouningt/'로 시작되는 모든 빈
bean(accouningt/*)

# 이름이 'dataSource'나 'DataSource'로 끝나는 모든 빈
bean(*dataSource) || bean(*DataSource)
Spring AOP 구현
먼저 AOP를 사용하기 위해 pom.xml에 dependency를 추가해준다!!
#pom.xml

# aspectjweaver
<dependency>
    <groupId>org.aspectj</groupId>
    <artifactId>aspectjweaver</artifactId>
    <version>1.9.8</version>
    <scope>runtime</scope>
</dependency>

# aspectjrt
<dependency>
    <groupId>org.aspectj</groupId>
    <artifactId>aspectjrt</artifactId>
    <version>1.9.8</version>
    # 여기는 scope 없음에 주의 !!
</dependency>
package com.test.aop;
import java.util.Random;
import org.springframework.stereotype.Component;

@Component
public class Driver implements Person{

	@Override
	public void doSomething() throws GasException {
		System.out.println("열심히 운전을 합니다.");
		 if(new Random().nextBoolean()) { // 예외 발생
			 throw new GasException();
		 }
	}
}
XML 이용
applicationContext.xml 파일 내에서 Aspect Class를 <bean>으로 등록해준다!
# applicationcontext.xml

<?xml version="1.0" encoding="UTF-8"?>
<beans xmlns="http://www.springframework.org/schema/beans"
	xmlns:xsi="http://www.w3.org/2001/XMLSchema-instance"
	xmlns:aop="http://www.springframework.org/schema/aop"
	xmlns:context="http://www.springframework.org/schema/context"
	xsi:schemaLocation="http://www.springframework.org/schema/beans http://www.springframework.org/schema/beans/spring-beans.xsd
		http://www.springframework.org/schema/context http://www.springframework.org/schema/context/spring-context-4.3.xsd
		http://www.springframework.org/schema/aop http://www.springframework.org/schema/aop/spring-aop-4.3.xsd">


		<aop:aspectj-autoproxy proxy-target-class="true"></aop:aspectj-autoproxy>
		<bean class="com.test.aop.CarAspect" id="carAspect"></bean>
		<bean class="com.test.aop.Driver" id="driver"></bean>
		<aop:config>
			<aop:pointcut expression="execution(public void com.test.aop.*.doSomething())" id="mypt"/>
			<aop:aspect ref="carAspect">
				<aop:before method="before" pointcut-ref="mypt"/>
				<aop:after-returning method="after_rt" pointcut-ref="mypt"/>
				<aop:after-throwing method="after_th" pointcut-ref="mypt"/>
				<aop:after method="after" pointcut-ref="mypt"/>
			</aop:aspect>
		</aop:config>

</beans>
@Aspect Annotation 이용
# applicationContext.xml

<?xml version="1.0" encoding="UTF-8"?>
<beans xmlns="http://www.springframework.org/schema/beans"
	xmlns:xsi="http://www.w3.org/2001/XMLSchema-instance"
	xmlns:aop="http://www.springframework.org/schema/aop"
	xmlns:context="http://www.springframework.org/schema/context"
	xsi:schemaLocation="http://www.springframework.org/schema/beans http://www.springframework.org/schema/beans/spring-beans.xsd
		http://www.springframework.org/schema/context http://www.springframework.org/schema/context/spring-context-4.3.xsd
		http://www.springframework.org/schema/aop http://www.springframework.org/schema/aop/spring-aop-4.3.xsd">

    <aop:aspectj-autoproxy proxy-target-class="true"/>
    <context:component-scan base-package="com.test.aop"/>

</beans>
다음과 같이 annotation을 이용해 Pointcut을 설정해준다!
// CarAspect.java

import org.aspectj.lang.annotation.After;
import org.aspectj.lang.annotation.AfterReturning;
import org.aspectj.lang.annotation.AfterThrowing;
import org.aspectj.lang.annotation.Aspect;
import org.aspectj.lang.annotation.Before;
import org.springframework.stereotype.Component;

@Component
@Aspect
public class CarAspect {

	@Before("execution(public void com.test.aop.*.doSomething())")
	public void before() {
		System.out.println("차를 탑니다.");
	}

	@AfterReturning("execution(public void com.test.aop.*.doSomething())")
	public void after_rt() {
		System.out.println("주차를 합니다.");
	}

	@AfterThrowing("execution(public void com.test.aop.*.doSomething())")
	public void after_th() {
		System.out.println("주유소에 가서 기름을 넣습니다.");
	}

	@After("execution(public void com.test.aop.*.doSomething())")
	public void after() {
		System.out.println("차에서 내립니다.");
	}
}

'WEB > back-end' 카테고리의 다른 글
| Spring MVC 실습 (0) | 2023.04.24 |
|---|---|
| Interceptor (0) | 2023.04.22 |
| Spring (0) | 2023.04.21 |
| JDBC를 이용한 DB 연결 (MySQL) (0) | 2023.03.24 |
| DAO, DTO, Entity 란? (0) | 2023.03.22 |